

Phase Two begins with preparing the panels for cording.
In the meantime, I was told about the write-ups at https://curvecouturecorsets.blogspot.com/2011/05/pretty-housemaid-corset-made-by.html and https://curvecouturecorsets.blogspot.com/2011/07/pretty-housemaid-construction-notes.html
video above: documentation of the second phase of this project
Construction
This part scared me quite a bit, because initially, I couldn’t find any references that gave clear guidance.
I knew that there was cording, which meant that there would have to be be at least two layers. But there was also a busk and back boning, which would possibly required heavier fabric.
Finally, I came across the following photo in Google Images, linked to the paid article at http://yourwardrobeunlockd.com/index-of-articles/historicalperiods/vintage20thcentury/845-mrs-pretty-part-3-corset.
This had huge implications on how I decided to construct my interpretation.
There appear to be four layers: Top fabric and under layer (between which the cording is presumably positioned), hessian/burlap/jute, and the back fabric. On the Leistershire County Council page, they list only that “The corset is made from a green/brown twill which has been lined with a beige coutil and interlined with hessian. Support is provided by cording across the hips and down the front, with minimal whaleboning.”
So I decided to follow a 4-layer construction.
I had a pretty patterned blue top-layer selected (which ended up being unfortunately flimsy, but I worked around that one…), I backed it onto a layer of cotton and corded between the two.
Cording
How to cord?!
I think I overthought and over-engineered the cording panels.
And/or I used too thick of a cord.
I decided on a 1/8 inch cording channel through which I pulled some long-fiber hemp twine. It was snug. VERY snug.
My reason for using the hemp was that it was similar in feel to the burlap.
I used the hip panel to gauge the channel size. I counted around 30 channels on the original, with an uncorded section at the bottom.
30 x 1/8 inch fit the space allocated.
I played around with some other channel sizes, but felt that the larger channels resulted in too flimsy of a panel.
Having never handled the original, I have no idea on how sturdy it should feel.
In theory, I could have corded the pieces as I went, but I was concerned about the bust panels, which do not follow straight lines. Each set of 3 cords flair away from the bust. I thought that the only way to ensure that they lay correctly was to pre-sew the channels and then pull the cord through.
Besides, the resulting panel from attempting a cord-as-you-go technique felt floppy, too.
What next?
I cut a layer of burlap (which had a much more open weave than the hessian shown in the photo above, but it’s all I had) for interlining.
And I cut canvas to act as my back layer. It didn’t bother me that the canvas wouldn’t feel smooth against the skin, as I would be wearing a chemise underneath.
I used a basting line around the outside of the pieces in order to fix the the two layers together before undertaking the cording.
With the smaller pieces, I pinned extensively before cutting them out, and then basting them.
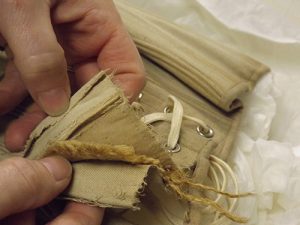
One problem that I noticed when doing the cording was the extent to which the very lightweight top layer was fraying at the point of inserting the cord.
So I figured that I would piece together a stabilizer of sorts with a strip of my cotton fabric only at the cording entrance where the fabric was under the most strain and most prone to fray.
As I stitched the channels, I extended them to go over the extra layer of cotton, and then started inserting the cording between the two layers of cotton instead of between the cotton and satin.
I also decided to thread my bodkin with a heavy duty guide thread with which would then pull the hemp through. The purpose of this was to try to keep the bulk down as much as possible. (see the video above for details on all of this)
The hip panel contained the most cording, and after three corded channels I was faced with a very sudden realisation that the bunching of the face fabric meant that I should only work 3 cords at a time so that there wasn’t a compounding effect at the end that might bend the panel out to the front (or skew the fabric itself)
With all of the panels corded, I re-marked the proper edges from my pattern pieces. There had been shrinkage, so I wanted to make sure that the pieces would still be the correct size.
The next step was to add the burlap.
I planned to use the same technique used on collars and lapels – pad-stitching to incorporate shape. But this part also posed a question – whether I should stitch it to the canvas or to the corded section … and whether I should do it before or after assembling the panels … and then, the further question of whether I should assemble the front pieces (with or without the burlap) separate to the canvas (with or without the burlap), or assemble everything together all at once in one pass. These types of things troubled me for days. It was like I was an apprentice having to make executive-level decisions!
I made the choice to treat the seams as one – sewing everything either to the front or to the back (I must point out that in all of my research, I hadn’t been able to locate a picture of the inside of the corset, so could only assume that perhaps what I had thought were boning channels on the outside (until reading of “minimal boning” from the Symington page) was actually seam casings).
But whether turned out or in, it meant that the individual panels would need to be finished before the whole thing could be assembled … and that I had a LONG way to go before I could get a glimpse of the finished product.
Before doing any pad stitching, the burlap pieces were trimmed down to the marked piece sizes so that there wouldn’t be any burlap in the seams when joining the panels together – an effort to reduce bulk.
The pad stitching was very slow-going. Mostly because life happened, and then COVID (and face mask projects) happened, and then
Here’s a gallery of photos going through the cording process to assembly of the first half.


