

As I write this, I’m in the midst of a face-mask sewing marathon. The past 4 days, where I have worked on this project from waking until sleeping, feel more like 14.
Perhaps I am wrong in thinking so, but the use of elastic in the masks could result in a less-than-desirable level of longevity. High temperature sanitizing laundering in hospitals would be hard on the rubber, after all.
I was torn between “quick” elasticated masks, and ones that would require a yard of tie-cord per side, per masks. 2 yards per mask.
My everlasting desire to make items that are at least long-lasting won.
I cut my first strips on-grain (4 pieces thick or so) using excess from cutting out my masks. While I didn’t need them to be stretchy like bias, I still sewed them together diagonally, ironed the seams, and then used my bias maker and iron to fold the edges into the center. The resulting tape finally made its way through my sewing machine … but after taking 3.5 hours to make enough cording for a very meager 9 face masks, I rapidly started to feel disillusioned.
Searching on Google resulted in trying the “continuous” bias tape method.
I tried it.
It took considerable time to mark the strips in pencil.
It sewed together in a snap.
It took considerable time to cut (to my knowledge, there’s no way to cut multiple layers at a time), and even with my rotary cutter, the strips weren’t as regular as I might have liked.
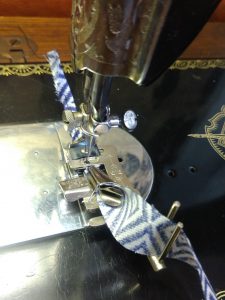
If you’re cutting a 2 or 3 inch size strip, edge variations might be more tolerated, but my strips were destined for the one-pass binder attachment on my 1934 Singer treadle – at a very precise 15/16th of a inch! Tiny variations made a huge difference.
The problem played in the back of my head as I made 20 masks at a time … inevitably stalling as it came time for the cords.
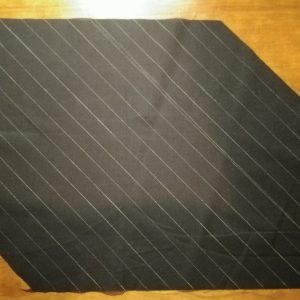
And then, the obvious hit me: I was in need of so very, very much tape, that I could easily use a solid yard of fabric rather than piecing together off cuts.
Furthermore, on the basis of a 1-yard cut of fabric, as donated by Joann Fabrics for this purpose, the longest diagonal strip of seamless fabric stood to be some 50 inches – more than double the seamless length of the continuous method (and therefore less tricky spots going through my attachment)!
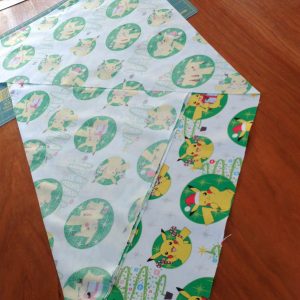
The big game changer was that I figured with careful diagonal folding and pressing, I might just be able to cut the entire 50-inch length in ONE PASS with my rotary cutter and 18-inch mat.
Yes, my friends.
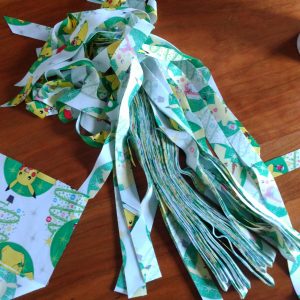
Armed with a fresh blade, I cut a yard of fabric into enough bias strips for about 19 masks in just about as much time as it had taken me to mark the pencil lines on a rectangular “continuous” piece amounting to strips for only 6 masks.
Each strip still had to be attached to the next, but I did that right at my sewing machine, pinning and unpinning as I went.
Bottom line, this “fold ‘n cut” method meant that in under 2 hours, I had cut enough strips for 19 masks (approximately 38 yards), and sewed enough for 11 …
Compared to about the same time to cut and sew enough for 6 (12 yards).
Do you need a lot of bias tape? Try this.
You need :
-
-
- 1 yard of fabric (doesn’t have to be perfectly square – you can just use the selvedge edge as a guide when you fold.
- An iron
- A rotary cutter
- A rotary mat (18″ recommended)
- A metal ruler (or other as will stand up to the edge of the rotary blade)
- A transparent quilting rule with fraction measurements is useful (you can line up the previously cut edge with the appropriate mark, and then place your metal cutting rule immediately against to allow you to cut without marking)
-
Follow this guide, pinning the layers to secure them and pressing the folds as you go. Align the folded edges as best as you can.
DO NOT force the fabric backwards and forwards while ironing – the diagonal grain is very stretch and you’ll skew the thread.
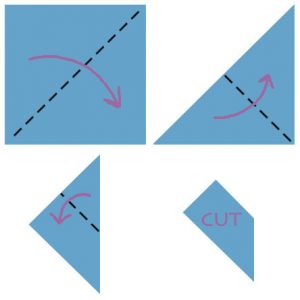
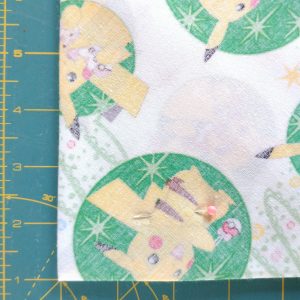
The final layer of fabric will be 8 layers thick.
The FIRST cut you make will be across the top folded edge – cut off a minimal amount (1/8 or 1/4 inch) to rid yourself of the fold.
Proceed using your guides to cut your needed strips.
Sew the ends together as you would normally do with bias tape.